As I haven't seen the models themselves, I am reliant on what each member has said. I have to say that some were more terse than others! Taking them in the order that they appear on the web site...
Peter Carlo
Peter shows us a couple of images of a pair of Trumpeter 1/35th scale Russian unguided ballistic missile vehicles - a Frog 5 and a Frog 7.
John Ovenden
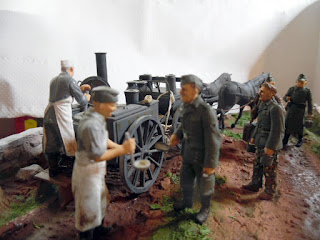
Next up is a very nice diorama from John based upon a Great North Rad resin diorama base. The figures come from a MasterBox set. The diorama shows a group of German soldiers having a meal from a mobile kitchen. The title of the diorama is "Meal Break". John provided a lot of view so I have chosen a few.
Bill Banks
Bill always goes for the difficult older kits. These two presented here are no different.
Bill says "Have completed 2 planes.....Republic P47D Thunderbolt. I
enjoyed the build.early Airfix 1.72. An interesting aircraft with a twin
Wasp radial engine also turbo charged. It was the heaviest fighter in WW2. It
held the world speed record for prop planes at 509mph at one time. This was a
local plane based at Boxted. Its fuel consumption was high so it was fitted with
reserve tanks. These were interesting as they were made with laminated
plastic coated paper in order not to give the enemy scrap metal when dropped. Later
used for dealing with flying bombs and target towing.
No 2. Vultee Vengence Mk11 (A31) Also radial
engined. These engines do interest me. The strange wing shape is due to the
centre of gravity being wrongly calculated and rather than alter the wing root
the wing design was amended.The last plane to carry the Vultee name..merged
with Consolidated and became Convair."
Jeff Adams
Jeff's description is as follows:
"Please find attached two photos of my KV2, which I finished recently.
It is 1/35th scale and the kit is by Zvezda.
I won the kit last year at the 2019 Mafva show.
It is an OK kit, but I would not recommend buying it.
The Trumpeter alternative, is much better in all respects.
I used the kit "rubber band" tracks rather than the link and length ones (also in the kit) because the latter had many knock-out marks from the moulding process.
In order to achieve the characteristic track sag, I used metal wires (old guitar strings) which were positioned through a series of holes drilled in the lower hull sides. This provided a downward tension on the tracks between the upper return rollers.
This is not a new technique, as I remember it from articles written for Airfix magazine in the 1970s! The model was constructed relatively quickly and most of my time was spent on painting and weathering. I used my new Airbrush (Sparmax 0.2 nozzle) to try and achieve the look of faded winter whitewash. The remnants of paint are whitest at the top of the vehicle and tone down to mud and earth lower down on the tracks. There is a figure of a Russian tanker in the top hatch, but I only detailed the head - because very little else of him is visible."
Peter Terry
"Frog kit of the Douglas Boston 1/72 scale i purchased it at the last St Ives Brampton Show as part of my Golden Oldie kit builds from a second hand dealer “no parts missing”so the build was with out drama. Two choices of markings one Canadian night fighter version from a squadron based in Essex and the second one is Australian Air Force South West Pacific as seen completed in the images.I am all ways amazed at how well the older kits hold and with modern day paints and finishes enable you to make a good model.
David Pennington
My effort comes from some time ago.
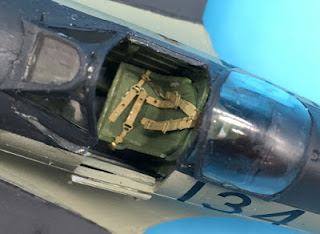
Special Hobby 1:48 Supermarine Seafire Mk.XV. "Far East Service"This was purchased to complement the 1:48 Hawker Sea Hurricane. I was a bit wary, having had problems in the past with these supposedly short run kits. However, it went together reasonably well. There was one difficult moment. I was working on the cockpit and released the front bulkhead from the sprue. I left it on the table whilst I did some other work on the seat. When I turned back to it, the part had disappeared. Now the first thought was that the "carpet monster" had it but lots of searches by both me and my wife failed to find it. In the end, I used the rear bulkhead as a model and created a new one.Everything else went according to the instructions and I had no further issues, including using the Eduard seat belts.
The serious problems came when I started to put the decals on. I chose a set of markings for early 1946 but the first decal that I tried to put on the plane broke up into little pieces. Because all the markings in the kit used these decals, I wasn't able to complete the aircraft. The way out was to buy a new set of decals. Soon, from my regular suppliers, came a set of Kits World decals for Seafires. On arrival, I realised my mistake - all of the aircraft on the sheet were bubble canopy versions. Back to the ordering page and a set of Model Alliance decals arrived shortly after. These are for the same style of Seafire as I had but - not quite -. However, these were the only two sets of decals available for the Seafire so I had little choice but to go with the later set. The only FAA one that fitted the colours that had painted the model was SW912, "134/T' of 804 NAS, HMS Theseus, 14th Carrier Group, February 1947. This was probably a bit too late for my model, which is a Seafire F Mk XV. However, beggars cannot be choosers. As it is, I am very happy with the final result. The model took a lot of work, being from a short run manufacturer but ended up very tidy.
Geoff Woods
Geoff is a figure painter "par excellence" and, now he has retired he is spending more time on the hobby.
1st is a Castle Miniatures, 75mm of a Landsknecht
Doppelsoldner
Stormtroopers, Officer, Light Infantry.Foot
Guards
Nuts Planet Roman Aqualifer 1/10 scale
0830 Artists Preservation Society 75mm Welsh Fusiliers
Troop 54 54mm French Guard 1805
Troop 54 54mm French Guard 1805
Colin Ovens
Colin has presented us with the only WIP (work in progress).
I'm in the throes of building an
Airfix 1/72 Bristol Blenheim If fighter... almost every article and almost
everyone I've spoken with about this kit have warned me that building it is an
"interesting experience" - to put it politely! They are right!
Don't get me wrong - I am enjoying the build, but it is certainly not a "shake 'n' bake" kit! The parts are beautifully detailed and crisply moulded, but major sub-assemblies have a marked reluctance to fit as well as hoped... Arthur Banyard's "Modeller's Article" on our website makes it clear. Peter Terry called me about ten days ago, and during our chat he asked how the Blenheim was going, and I told him how far I'd got, and that I thought I was past the awkward bits; then he told me, in a sombre tone, that I had still got the engine cowlings to come. They were quite easy - if you are good at juggling jelly!
As you can see from the photos taken ten minutes ago (sorry about the shadows!), the masking for the extensive glazing (by Montex) is in place, and a coat of RAF Grey Green (Xtracrylix XA1010) has been applied to represent the canopy's interior framing, and the engines (with those b****y cowlings) are built.
The model will be painted and decalled before the installation of the engines. When completed, the model will represent a Bristol Blenheim If of 29 Sqn, at RAF Digby in Lincolnshire in late July 1940.
Airfix rate this kit as "Skill Level 2". If you want to build a half decent model from it, and not just stick the bits together, hoping to produce something that looks rather like a Blenheim, I would rate this kit as being "Skill Level 4" because of its inherent construction problems.
All the best.
Conclusion
Well, that's it for the first, maybe unique, virtual club meeting. Lots of photos and lots of interesting details. Oh, and lots of really good modelling. Let's hope that this is the only virtual meeting but I bet it won't be! Thanks to all that contributed their time and effort.


No comments:
Post a Comment