Virtual Meeting July 2020

Well, the lockdown is just coming off but we still can't get together so we have yet another virtual meeting! This time, we have seven contributors (although we may have seen some of these before).

Peter made an announcement at the start of the meeting. "All things being equal, we hope to restart the physical meetings at the Brotherhood Hall on the usual day in August - 6th - usual time."

Added by the Webmaster - "Make sure that you all have a model to show - although any that have been on the virtual table will be welcome on the real one!"

In addition, there is an exciting new book from Colin covering camouflage schemes for the RAF throughout the war. I will shortly be putting that up for download so wait for my e-mail!

OK, so here we go. In alphabetical order and in their words:

Jeff Adams


Attached are 5 photos, for the Clacton IPMS virtual meeting later this week. I have been working on various models during the lockdown but here are images of two that are actually complete. 


The first model is a German armoured car Sdkfz 222 in 1/35th scale. It is the Tamiya kit which dates back to the 1970s, if I recall correctly. I made this example in the late 1980s and used etched brass for the anti-grenade screens - which was quite revolutionary for the time! The model was constructed but never painted, until I found it in a cardboard box some weeks ago. I used my airbrush and Tamiya acrylic paints to represent the look of a vehicle taking part in Operation Barbarossa - the invasion of Russia, 1941. 


The second model is a 54mm Napoleonic soldier made from a plastic Historex kit. The uniform shows an artilleryman of the Garde Imperiale, foot artillery 1809. I have a large collection of these Historex kits and spare parts in my stash and enjoyed re-visiting the art of constructing and painting figurines. This particular model was painted entirely using artist's oils and incorporates many techniques gleaned from a series of modelling tricks and tips published by Stanley Catchpol (Bryan Fosten) in Military Modelling magazine from many years ago.

Bill Banks - Mustang Mk. IV - RAF.


A David style haircut is not for me. Looking forward to shearing time.


This is a 1.72 Airfix kit by courtesy of John. He is off 1.72 and I am of that. mind at the moment.The kit went together well......any problems were down to me..Careless.All will be knowledgeable of this famous aircraft.

A request by GB Procurement Group at the beginning of the war to North American. to manufacture Curtis fighters for the RAF spurred them to produce their own design the Mustange.This was in production very quickly. However the performance was limited by the Allison engine fitted.A change to RR Merlin engine transformed the aircraft to as we know it.Taken up by RAF USAAF and many other countries. It was in use until 1984. Many are in private hands. Some 15000 were built The US aircraft were fitted with Merlins manufactured by Packard.

Peter Carlo


SAAB JA-37 Viggen

 This is a ‘Tarangus’ kit: a Swedish kit manufacturer of all things. It’s a very good kit but needs careful assembly due to very close tolerances for fit. This means hardly any filler is needed. Good cockpit and engine detail. You need to note the thrust reverser is partially closed when on the ground and it needs painting before assembling the fuselage.


 After assembly – Painting!!!Maestro Models make a complete paint mask set – very complex. I started at the wing tips and worked inwards marking up which colours went where. This took me three days to avoid eyestrain. Keep the backing sheet as you need somewhere to hold the panels when you need to paint them a particular colour. It’s a case of, paint one colour, leave it a day to dry thoroughly, re-mask and paint the next, and so on. You start with a completely masked aircraft and finish with one set left over from the final paint colour, allow to dry then try to remember where all the masking is to remove it. The scheme comes out very well with only minor touch ups.

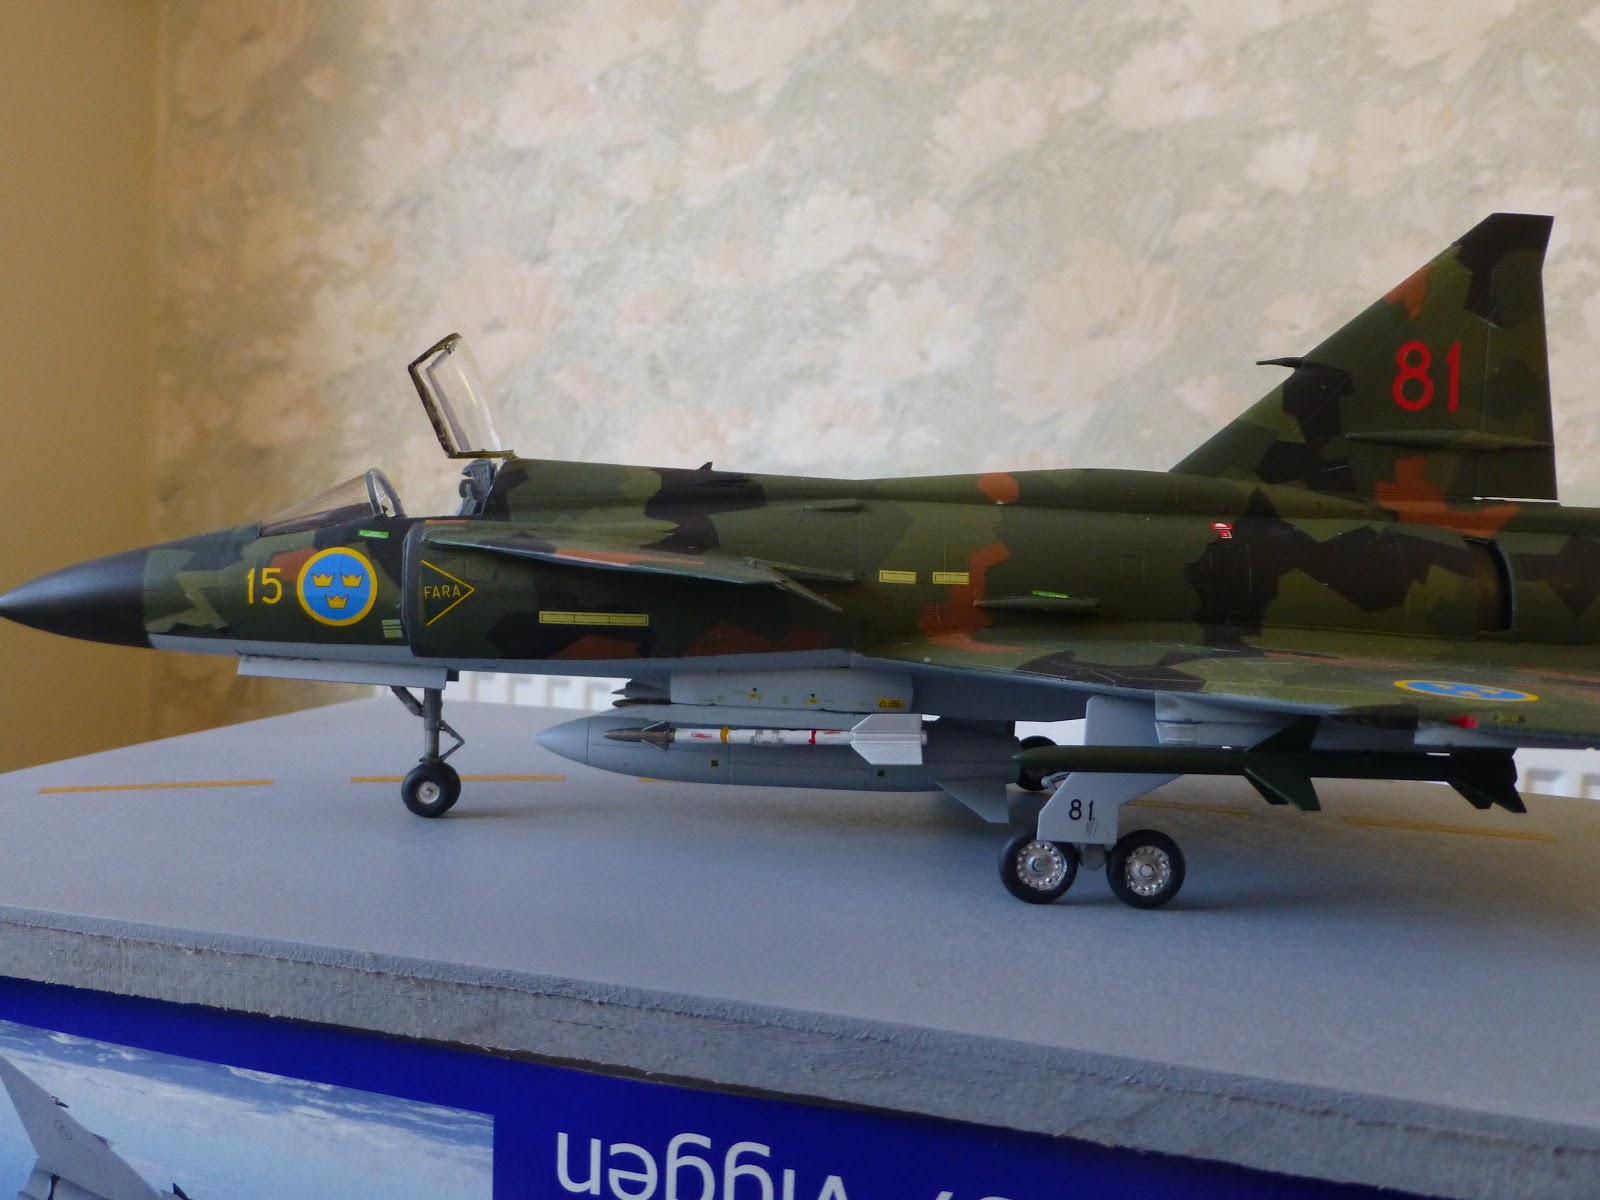
 Details settle very well with Micro Sol/Set and show up surprisingly well against the background. Remembering the 80’s Airshows it captures the look of the real thing.To quote the magazine advert ‘It satisfies the need for Sweed’, (and, yes, it is spelt like that!)

Colin Ovens


Please find attached four photos and a Modeller's Note/Article on the Revell 1/72nd Royal Navy Corsair IV.


I'm now returning to my new "Viva Fidel!" theme... unless I spot something in The Stash which I'd purchased enthusiastically at "the time" and always meant to build, but have put it off... in the pile are two Hasegawa 1/48th F-4 Phantoms (a USAF F-4G and an RAF FGR.2) which I've had for so long that I am ashamed to recall (the F-4G was bought at the 1982 Mildenhall Air Show for £8.95 and the FGR.2 was bought in 1990 for £12.00). Then there's a 1/72nd Revell PBY-5A Catalina which Robin had bought for me last Christmas... and then there's that Trimaster 1/48th FW190, not to mention several Eduard Spitfires in both 1/48 and 1/72...

No! I'll stick with Fidel Castro for the time being (next up is a trainer MiG-15UTI)... unless I change my mind...!


David Pennington


Airfix 1/48th scale Hawker Sea Hawk FBII.

My first Airfix aircraft for a long time but I ust say one of the best kits I have ever made. 


Apart from a bit of a faf around the nose cowl, the model went together prefectly. The instructions were great and, unlike other kits I could mention, the wing fold actually went together without fuss. I put some seatbelts in using Tamiya masking tape and chose my favourite FAA colour scheme, which has the Extra Dark Sea Grey come down the sides of the fuselage. All in all, a great model that I am proud to have made.


Jim Smetherham


We might have seen these before but, here goes...


First is a Meng 1/72 of a G91R/3 light fighter bomber in German airforce livery. “Bull’s Eye ‘79’. The G91R was the first combat aircraft designed and developed by Italy itself after WWII. It’s on the stand as I didn’t put quite enough weight in the nose 


The second is an F-102A with case x wings. Again a Meng 1/72 kit. This is in the livery if 327th fighter interceptor squadron 1958.
I had a lot of trouble with the undercarriage. So much so that I abandoned it and tried something different. I used a piece of 10mm exterior ply covered it with blue for the sky. Used piano wire from my RC modelling supplies to create an inverted L shape which was glued into the ply and glued into a balsa fillet which was in turn glued to the turbine exhaust(?) at the rear of the plane. I then added some white cushion/ soft toy filler to create a cloud to try and give the illusion of it flying. 


Peter Terry


Sword Avenger kit number SW72114 1/72Scale


One of the latest Sword releases for a whole family of Avengers containing a number of foreign navy markings with more versions to come, These Sword kits are no shake and bake exercise's but adding a little time can get good results wing slots need filing out to get a sound fit and precise fitting and location of the undercarriage is needed but all in all a very enjoyable build I completed my kit in the markings of the Royal Canadian Navy .

Virtual Meeting 4th June 2020

Well, we are all still here and not getting together! It seems like August might be the first time that we can get to the hall again. Let's hope!

Anyway, we have a nice lot of models to look at this month. As usual, they can all be seen on the club web site. However, all the members give me some good details of their models so it would be a pity to waste the information so here goes:-

Arthur Banyard

Arthur has provided a clear set of images and some detail about his build of an Airfix Hawker Siddeley Harrier GR.3.

As soon as I can, I shall be putting together an short article covering this build. In the meantime, here is the finished article (more images on the web site).


Bill Banks 

Bill does select some interesting (aka old) kits to build during the lock-down. The first that he has provided for this month is an Airfix Douglas Dauntless.


He has also provided a detailed description of the build and the aircraft as follows:

Monogram 1:48 Douglas SBD Dauntless WW 11 Dive Bomber The instruction sheet was printed copyright 1959 and 1967 which makes it my oldest kit  to date, It is intended to be built as a working model ie retractable wheels , working dive flaps and bomb release,.The thought of demonstrating a toy aircraft to our erudite members was enough to decide to build static model, The plastic was a hard self colour dark blue. As advised by Colin I spray painted it with Humbrol Midnight Blue and the decals went on fine, It went together very well. In fact the wing assembly clicked into the fuselage so positively I could not release it to apply adhesive. Speaking of adhesive, I used Humbrol Polystyrene Adhesive from a tube,,,,,remember that? It gave delay on the long seams.A feature I enjoyed was the fact that the canopy frame was moulded with two parallel lines giving the correct width. Thus paint was contained between the lines and there was a firm line to tidy with the cocktail stick. Wish they all did that.This was a successful aircraft in the Pacific war and had the highest ship destruction score...including  6 Japanese carriers.The SBD stands for Scout Bomber Douglas. I’d dived at 80 degrees thus there was fitted bomb release gear which diverted the central bomb away from the prop arc. A land plane version was the Banshee..not popular. Used by US Navy. Free French NZ Navy and the FAA which had 9. The lack of folding wings led to its demise..crowded decks as seen on photos. USS ship no 22 was USS  Independence. This was a carrier built on a cruiser hull. It carried 30 aircraft 9 of which were Dauntless. It was damaged  in 1944..repaired back in service. At the end of the war  was used to ferry men and materials from the war zone. In 1946 it was deployed in Atom Bomb tests.Was scuttled highly radioactive. Since been found free of radioactivity with damaged air craft visible.. My next masterpiece will depend on availability of paint colours. Hope you are all well...Bill PS bet the guy in the rear cockpit enjoyed the dives,!!!

I have memories of building a Monogram B-66 which could drop a bomb plus a Grumman Avenger with folding wings. I even had that kit in the shop for a while until some brave soul bought it.

David Pennington

I am not sure how others stand but I am shielding at the moment, which means that I cannot leave the apartment except for a single exercise trip each day. Hence, I am up to my eyes in hobbies! What with all change on my model railway (see Gentle Model Railways) and getting back into sewing patchwork - yup , I sit at a sewing machine for hours on end! (see David's other hobbies) I am a busy bunny. This month I have been mostly working on a Tamiya Flak 36. This, I understand, is quite an old kit but it is a long time since I built anything quite so complicated. You certainly get your money's worth. I am squeezed for space so I had to compress it onto a small base, which has taken away the authenticity of the diorama but, nevertheless, it looks great.


You even get a motorbike and rider!


Jeff Adams

Jeff has sent in some photos of - guess what? - a Sherman tank - and a very nice French hussar 90mm figure (as a rave from the grave). He says:

Please find attached, photos of 2 of my models for the Clacton Virtual model club meeting scheduled for Thursday this week.


The first model is a Sherman (what a surprise!). The 2 photos show a British Sherman 3, operating in Sicily in 1943. The kit is a Dragon 1/35th scale model that I had in my stash. I wanted to paint the typical, Mediterranean style camouflage used in that theatre. Of note, is the way that British Shermans often had the rear sections of the sand-shields moved to the rear deck, where they were welded upside down to produce storage for stowage items. 


The second model (4 photos), is a new departure for me and was inspired by the wonderful painting skills of Geoff Woods. It is a 90mm figurine of a Napoleonic Hussar (French) 1809, 5th Regiment. I found this pewter model in my loft, as an unpainted piece that I bought from a shop in Newquay, Devon whilst on holiday there as a teenager! It was sculpted by Charles Stadden, a prolific model maker, who produced the "Tradition" range back in the day. Unfortunately, it had sustained some damage over the intervening years and was minus it's plume for the shako (hat) and also had lost it's smoking pipe which determined the pose of the figure. I managed to scratch build replacements out of Milliput two-part epoxy putty, over wire armatures for strength. After this and a couple of coats of white undercoat, I got to work painting the figure. Although I used artist oils throughout, I took care to undercoat each section of the uniform with a thin coat of acrylic paint roughly matching the desired finished colour eg sky blue for the jacket and breeches. By doing this, the top coat of oil paint could be applied very thinly and allowed blending of shadows and highlights. I find that ultimately, there is no substitute for using artist's oils in terms of depth of colour and subtlety when painting figures. This is particularly true when painting faces. The down side is the length of time it takes to finish a figure like this. I reckon I have been painting this figure for most of the recent lock-down. However, I have been working on other models in parallel, at the same time and hopefully I can share photos of them next month.


I remember going to the Tradition shop back in the 1970s when I spent my evenings painting up Napoleonic and Peninsular War British war game forces. Such memories!

JohnOvenden

Here is my contribution for this month along with an article on the subject.

This months contribution is a 1/32 Revell model of the Arado 196B
The model depicts the Aado 196B which was produced by Fock Wulf and first took flight in 1937. Two versions were made one with a ventral flaot and two supporting wing floats as depicted, the other with two wing floats. It was used as a scout / reconnaissance aircraft on German capital ships where it, on occasions took on the role of attacking submarines and small ships. It was a robust aircraft and well liked by those who flew it. This particular depiction D-OVMB serial number 2592 was a test platform for the MG FF machine gun and under wing bonb racks. It's main propulsion was a BMW 9 cylinder rotary engine. Some 530 of the two main float types were produced by end of war. The plane continued to be used after the war up until 1950 by the Romanian and USSR forces.

The Model:


The model was sufficiently detailed within the cockpit including for safety harnesses pre-moulded on the pilots and navigator / Gunners seats.The pieces fitted snugly together with little or no flash to speak of. My only issue was with the cockpit canopy which was formed in three sections, front visor, centre section (pilots) and rear section for the Nav/Gunner, however each section was made up of three separate pieces, top, port and starboard sides. Not only were the sections difficult to place together using minimal glue, so not to run it over the clear canopy but the angles had to be judged so as to fit the fuselage when dry. Other than this, as ever, Revell= cost= nice build!!!

Colin Ovens

Please find attached four photos of the 1/72nd Airfix MiG-17F carrying the markings of the Defensa Anti Aerea de las Fuerzas Revolucionarias - Cuban Air Force, or DAAFAR. I've also written a little critique of the kit for the Members' Notes: it was so much more enjoyable to build than the Blenheim kit.


Peter Terry

Peter sent in two submissions this month - one a newer kit than the other. First off, one of Airfix's newer kits.

Buccaneer

Building this new kit of the Airfix Buccaneer has been slow for me distracted with other kit projects but I enjoyed this kit very much having made Airfix "s Phantom kit which in the words of there design team was over engineered and some thing they would never repeat. The Buccaneers goes together well good fit of parts and the end result a good version of this navy aircraft, Soon to be released will be the RAF version and I look forward to another great modelling session.


Avro Anson

Another golden oldie from me this time the Airfix Anson. This one kit that's been around a long time and shows its age particularly in the transparencies but i over come this by masking and using decal strip although given its age it still holds up well being the one of the few 1/72 scale kits on the market. Decals needed some care as age also played its part but liquid decal film came to the rescue making another classic kit to the collection. 


Peter Carlo

Soviet SS 23 Spider tactical ballistic missile system
This is made by HobbyBoss and is another kit to keep you off the streets! Lots of internal detail to be painted before you close up the cab and body. There is a well detail underside with the whole drive train shown. The wheels need to be attached before the support jacks so that it all sits correctly. Care is needed with the missile erection rams and pivot to enable them to work but you cannot extend the missile fins and retract it into the vehicle. The upper doors are very fiddly, and need a lot of care, but can be made to work. The missile is simple to construct but complex to paint. (Different shades of green to show access hatches.

This is a good kit of a fascinating subject which, perhaps fortunately, was traded away in the SALT missile negotiations.


Well, that's it for another month. This the nearest we can get to "going round the table". It is looking likely that we will have one more month of this before we get back to normal - fingers crossed!

June 2023

 Well, I am back at the club after over  6 months away. The meeting was very well attended. When I got there, it didn't look as though I...